Sunday 30 December 2012

Textile Inspired Paper Lamination

Today, the light improved and I took a picture of my paper lamination piece and for once the colours look pretty accurate in the photograph.


The piece was based on photographs I had taken of another textile piece, an idea which I had not explored before. I have used my trusty grid thermofax to create the laminated piece, which meant that only parts of the photograph were incorporated and the original image was fractured.  The paper lamination was then layered onto one of my 'rejected' pieces of gridy printed cloth. 
 
The colours in the detail photograph below are a bit washed out (normal service resumed!) but it shows the three layers in the piece in a way that you can't see when you look at it with the naked eye.


I used my favourite sections of the lamination and pieced them together with the dusky pink fabric, which were off-cuts from fabric I printed for one of my C&G pieces. There is a little bit of stitching on all of the panels, with the stitching on the central panel using thicker thread. The outer panels are slightly raised by the insertion of wadding underneath.

I've enjoyed my exploration into paper lamination and have another piece almost finished and another piece in the early stages but I think that it will be something that I will come back to occasionally but only occasionally.

Monday 24 December 2012

A Partridge in a Pear Tree

In November I went on a day course at the V&A to make a 'Partridge in a (gilded) pear Tree'. The course was led by Linda Barker and I had a very enjoyable day. Linda and the staff at the V&A were very helpful and thought of everything, even down to how you took your tree home.


The twigs were dipped in plaster of paris before we gilded them. I chose some mottled foil to cover mine and I was pleased with the effect. The foil was difficult to apply as it didn't come on any backing paper, so it was sticking to me almost as much as the twig. Although I had a very enjoyable day, I wasn't in love with the final piece but had intended to add some additional things to hang from the tree but as my heart wasn't in it, it didn't happen and I only finished the tree yesterday, another sign I wasn't in love with it. 


Many years ago, before I got into textiles, I would spend hours and hours decorating my Christmas cake but now I look for designs that are simple and reasonably quick to achieve. Here's this year's cake. I always use the same recipe but some years it turns out better than others. Why? I have no idea but I have a feeling that this cake is going to be a good one. Fingers crossed.


Our study door insists on closing and my husband wedges it open with an old envelope. Every time I notice the envelope I promise myself that I will buy a nice wooden wedge for the door. That was until recently when I borrowed the Recraft book from the library. The book encourages you to recycle things into new objects and one of the suggestions is to use an old jacket sleeve to make an owl door stop. Well not quite recycling as I made it out of some fabric that I had printed on and wasn't sure what to do with it. Hopefully, the owl will be welcomed tomorrow and replace the old envelope.


The kitchen beckons me loudly, so all that's left is for me to wish you all a very happy Christmas. I am looking forward to some creative time between Christmas and the New Year and  have a couple of textile pieces that I hope to finish. I hope to show you those soon.

Saturday 8 December 2012

Christmas cards in Waiting

Earlier in the year I posted about the Soft Circuit day course that I went on.  I got excited when I read that they were going to run a short workshop to make 3 electronic Christmas cards but my excitement was short lived when I realised that I couldn't go! Fortunately they sell the cards in a kit form and now they have arrived, let's hope that I can follow the instructions and get the cards to light up.


If you would like what the finished card should look like, have a look at the Technology will save us website.
 
Going back to less technologically advanced thumb printed cards, you may remember that I had planned to make robin and reindeer cards with my nephew . However, he had different ideas and he decided to make table name plates for everyone, which were lovely. Here's mine:


Apparently I am laughing so much that I am crying. I rather like it but it's made me think that I must do something with my hair!

Sunday 2 December 2012

Fun printed Christmas Cards

I am planning to print some Christmas cards with my nephew later this week but I just couldn't wait to try the technique out. So here are my sample cards printed by me and with me! Thumb printed reindeer and robins....


The robins need a bit of refinement but I particularly like the fact that their eyes are not quite in line. I thought that maybe I could do some collaborative cards with my nephew, with my thumb prints being the adult robins/reindeer and his could be the babies.....it could work well.

Wednesday 28 November 2012

Altered Photographs - local field

In a previous post I showed you some examples of the photographs that I had worked into and I thought it would be interesting to see what would happen if I took one photograph and worked into it using different techniques and at last I have something to show you....

Scratched into and painted with koh-i-nor

Oil pastels over painted with koh-i-nor and some scatching into on the horizon


Emulsion painted over photograph and worked into
 
Black and white photograph over painted with koh-i-nor
 
This is the same image that I used in the earlier post, and I must say I prefer my earlier version. So much for 'practice makes perfect'!  There is one thing that I think has made a difference and that is the size of the photograph. On the course I used professionally printed photographs which were 5X7 inches and these photographs were only 3.5X5 inches.
 
If you were  thinking of drawing into your photographs I would recommend using a larger size, as it's much easier to see the details and to work into it.

Sunday 18 November 2012

Printed and stitched Christmas Cards

Each year I like to make a few of my Christmas cards and the number I make depends on how much time I have and how long they take to make. This year I have made some very simple and quick cards. This card was printed using a thermofax screen I bought from here at the Knitting and Stitch Show. I covered up the berries, so they didn't print which allowed me to add them later using a high tech skewer dipped in red ink.

 
But I couldn't go without stitching any cards and when I saw the Kutch Christmas Card in Stitch Magazine I thought I would have a go at making it. I really enjoy hand stitching but this made me realise that I don't enjoy it quite so much when every stitch stitch is dictated by a pattern, I find it more enjoyable to stitch more freely. After a number of attempts at this card I just had to give up, it wasn't turning out how it thought it should and the time I was spending on it didn't justify the result. Perhaps I needed to read the instructions more carefully?
 
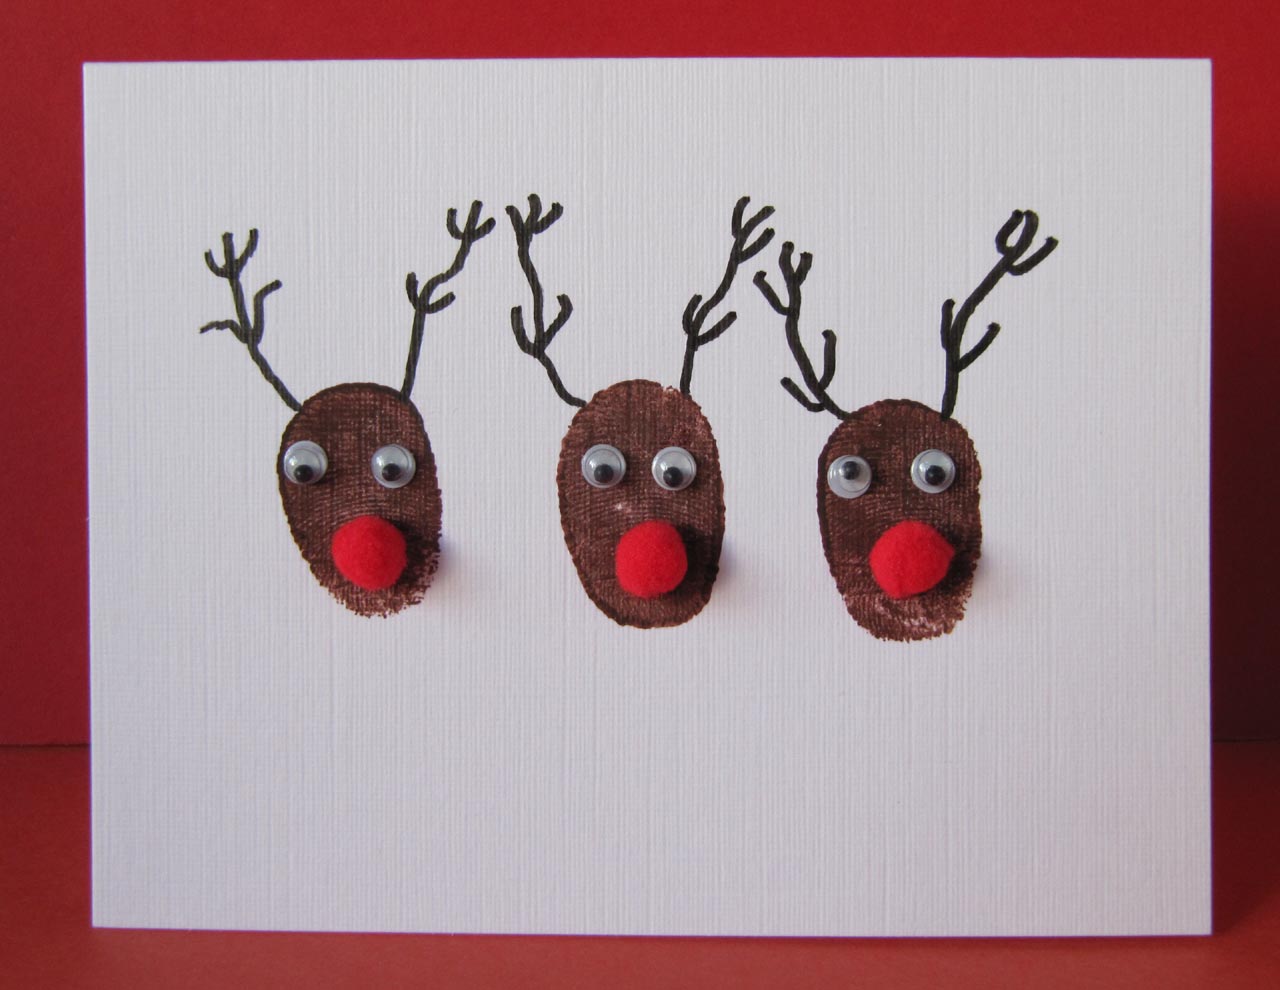
So I needed a plan B and I found this Pattern on the internet, which is intended to be stitched onto card rather than fabric. I liked the simplicity of the card and it was something I could achieve in the time I had.
 
 
The background fabric was left over from the cushions I made recently. I have been using a number of leftover or discarded pieces of fabric recently and I find that very satisfying. I always knew I right to keep all my 'rejects' and left overs!
 
I reduced the pattern to 80% of it's original size but this taught me a lesson. Instead of reducing the image to a size that pleases me, I will reduce it to a size that fits comfortably inside a readily available aperture card. Actually it's got to be easier not to use aperture cards at all, as I find it difficult to get the fabric taut inside the aperture. As I was stitching these cards an idea suddenly came to me for next year's cards - I just have to try to remember it! Mmm...
 
But this year's card making is probably not over yet as I hope to make some fun cards with my nephew when I see him in December. I've been collecting a few bits and pieces for these cards and I am really looking forward to it. I hope he's as enthusiastic as me because if not ,it'll blow my cover and I'll have to confess it was me that wanted to make them all along!
__________
 
I started this post yesterday and it seems that blogger and/or me had a wobble and so I apologise to anyone who saw an unfinished post. Now onto my Christmas cards....

Tuesday 13 November 2012

Inspirational weekend in Italy

We're just back from spending a lovely long weekend in Italy with Peter, a friend of ours. We were very well looked after and spoilt with nice food, beautiful scenery and a packed and interesting itinerary. I really enjoyed seeing the autumnal colours even if it was sometimes through the rain!  Here are just a few of the many photographs that I took.


I love the colours of autumn and was really pleased to see these beautiful landscapes and seeing the autumnal colours of the land reflected in the lakes was a bonus. I wouldn't be surprised if these didn't inspire some work in the very near future. Watch this space but don't hold your breath!

Saturday 3 November 2012

Altered Photographs

On Wednesday I spent an enjoyable day at  Art Van Go  on a course led by  Vanda Campbell. The course promised to 'show you how to work directly on photographs to create exciting new images'. 

I was inspired by the techniques to create new images but early in the day, when I worked into this sliver of a photograph, I realised how these techniques would allow me to simplify my landscape images and potentially inspire new work. The colours need refinement but I think it has potential.

This field is a picture of two halves. The left hand side of the photograph was left untouched and I have worked into the right hand side. On the left I see lots of stems of plants and trees and on the right hand side I see a series of colours and which could be  used to inspire fabric printing. It wouldn't be easy but it would be possible.


This artichoke picture was cut in half and one half of the image was turned upside down. The aim was to make the two halves appear as a single image again. Unfortunately, it just seemed to call for me to redraw the part of the artichoke that I'd cut-off! But the process made me look more closely at the artichoke and I was pleased how the bottom part linked across the two sides of the image.


The left hand side of this image was one of my tulip fields and the right hand half was one of Gill's landscape photographs.  Again the aim was to work into the photographs in order creating a coherent single image. 


This tulip field was over painted with emulsion and worked into with water colour pencils whilst still wet. I was really pleased with how this simplified the photograph and into something that seems a bit more 'manageable'.

 
I've been looking forward to going back to my theme of landscapes and I think these techniques will give me some useful tools which in turn will inspire a piece of textile work. I fancy taking (say) 5 copies of the same image and work into them using different techniques and seeing where that takes me. If anyone has other techniques for simplifying or abstracting landscapes I'd love to hear about them.

Sunday 28 October 2012

Printed skirt

Just to prove it wasn't a one-off when I made the cushions, I have used my printed printed fabric to make something else useful and this time I made a skirt from this KWIK SEW Pattern.


Each summer I get skirt envy when I see people in pretty floral skirts but whenever I try them on they never seem to look quite right on me. So I thought I would make a skirt with a more geometric design to see if this would be more 'me'. It's a wrap around skirt and I used the same techniques as I used for my Gridlock  piece except I over printed with turquoise grids. To create the contrast edge around the skirt, I overprinted the edging fabric with solid turquoise. However, as you can see from the photograph the contrast between the fabrics is small. So much so that I'm wondering whether I should over dye the whole skirt with turquoise.

If you were thinking that it's a bit late to be making a summer skirt, you'd be wrong, rather I'm ahead of schedule for next year! Still not sure whether a patterned skirt is me but maybe I just need time to get used to it. 


Thursday 25 October 2012

Kaffe Fassett Quilts at the RHS Flower Show

Last week hubby went to the RHS London show where they also had an exhibition of Kaffe Fassett quilts and I thought you might like to see some of the photographs. Kaffe seems to be popping up quite a lot at the moment. Have I just started to notice him or is trying to raise his profile? There was an article on him in Good Housekeeping and I know he is doing a talk at the V&A in December.


Detail of the quilt above
 

Sunday 21 October 2012

Pre-Raphaelite exhibition and embroidery

On Friday evening I went to see the Pre-Raphaelite exhibition at the Tate.


I was surprised but pleased to see that the exhibition also included some textiles. There was some wonderful tapestries and embroidery. In particular I enjoyed seeing William Morris' bed. The bed hangings, valance and cover were designed and beautifully embroidered by his wife and daughter. There have been times when I thought I would never get to the end of the embroidery stage (my Gridlock piece comes to mind) but seeing the quality and amount of embroidery in these pieces put my work firmly into perspective. What would I say if my Dad asked me to hand embroider a bed cover, a valance and some bed hangings?  


Another highlight was the three fold embroidered panels portraying pictures of heroines. Unfortunately I couldn't find a picture of them to show you. The design of the panels was so like the paintings in other parts of the exhibition, down to the style of wallpaper and long voluminous hair of the women. I don't remember seeing paintings and embroidery in such similar style before. 

Yesterday, I went to my monthly session at Committed to Cloth. I made some progress towards finishing a couple of things off and I hope to show you those soon.  By then the dye should have gone from my hands!


Sunday 14 October 2012

Knitting and Stitch Show 2012

Today I went on my annual trip to the Knitting & Stitch Show. Usually I see lots of lovely threads but don't have any particular piece to use them on. This year I went with not one but two pieces in my bag and still didn't buy any threads. The show seemed particularly busy this year and the thought of getting my work out on the stands wasn't very attractive. I did buy this piece of work by Wendy Rudd though and I know just where it's going.


There were other pieces that I would have liked to buy and one of them was by Jae Maries. I think Jae's work offers so much to look at and discover. There's subtle layers and textures and I am left admiring how she makes all the elements come together like she does. Unfortunately, you won't be able to see all the detail from my photograph.


I would also have liked to take one of Hilary Hollingworth's pieces home. Unfortunately, I don't have a photograph of the piece because it was tucked in a corner and difficult to photograph. 

There were lots of pieces that I liked and not all could be photographed. Here are some where the technique also intrigued me. This piece was by Sian Martin and although the piece was hanging in strips the image could still clearly be seen.


Another eye catcher was the cross stitch car door on the Mr X Stitch exhibition stand. If you follow the link you will see details from the exhibition and it's worth a look.


And the detail of the work:


Another intriguing piece in the Mr X Stitch exhibition was by Diem Chau. How does that very fine fabric stick so seamlessly (no pun intended) to the bowl?


I thought this Tea Bag bowl by Barbara Cotterell looked great. How do people think of these things?


Coming back to fabric and stitch, I found this piece by Val Holmes inspiring for my own work. II has a simple landscape structure and has lots of variety in the colours and marks in the foreground.  The green section on the horizon line is the only part of the piece that's stitched.  When I've finished my square pieces I have promised myself I will go back to landscapes.  
 
 
Before I finish this post, I'd like to bring up the topic of photography. Why is it that some people positively encourage you to take photographs and to share them with others (Mr X Stitch for example) and others have signs telling you that it would be disrespectful to the artist if you were to take a photograph? Can anyone explain?


Sunday 7 October 2012

Art & fear


I have recently bought this book and read it on the commute to work. I think it will be a book that I will refer to from time to time and perhaps some parts will mean more to me later than they do at the moment. I have picked out a couple of thoughts from the book which I hope will encourage me (and perhaps you?) to do more work. From my own perspective, I am hoping these thoughts will encourage me to draw, something I know I should do more of. When I have a drawing or design that I am happy with, I need no encouragement to work with that idea in textiles and if I really like the design then there's no holding me back. Anyway here they are.....
 
  1. Art is often thought of as a magical gift bestowed by gods but over the long term natural talent is barely distinguishable from perseverance and hard work.
  2. Seeds of your next art work lie embedded in the imperfections of your current piece
  3. A ceramics teacher divided a class into two and told one half that they would be marked on the quality of their work, the other half were told they would be measured by the quantity of their work. At the end of the term, the best work was found in the group who were going to be marked by the quantity of their work. The quantity group learnt from their mistakes and improved with each piece, whilst the quality group spent all their time theorising about perfection.
 

And to show that I have been creative and not just reading about being creative, here is a detail of the stitching I have done on my  Changing Times paper lamination piece  which I previously blogged about. The colours are not quite true but I find capturing accurate colours quite challenging.
 

Thursday 27 September 2012

Review of Festival of Quilts 2012

Imagine my surprise when a friend emailed me to say that my quilt 'Drawn to Fields' had featured in a review of the Festival of Quilts in Patchwork and Quilting.

 
This is the page from the magazine, my quilt is in the middle on the right hand side. And it's in very good company - look at the lovely quilts around it. 
 
 
Those of you who have been following my blog will know that I was disappointed with my quilts when I saw them hanging at the FOQ. However, I have been very encouraged by the positive feedback I have received since the exhibition and also by having one of my quilts selected and printed in a magazine. So much so, I'm starting to think about next year's entry. Could you be tempted to enter something next year?


Friday 21 September 2012

Diversity at the Barbican

Earlier this week I enjoyed this exhibition in the Barbican Library.


The exhibition closes this weekend but if you missed it you  could see some of the group's work here and on other parts of their web site. It's well worth a look.


Monday 17 September 2012

Changing Times

I have a photograph that I would like to use as the basis for a new piece and thought that the technique of paper lamination would be a good way to start the piece off. I created a trial piece using a copy of The Times and some grey organza that I had kept from a bouquet I received some time ago.
 

I wanted to build the piece in two layers, the first one created from black and white photographs and the second layer built from some colourful fashion images.


I then printed grey lines on top of the piece and bonded it to a (previously rejected) piece of dyed cotton fabric. Always satisfying to find a use for those pieces that once caused disappointment. This is the piece before adding any stitching.


I couldn't predict how the piece would turn out but on the whole I am quite pleased with it. Maybe that's because I didn't have any particular image that I was trying to recreate and therefore I wasn't disappointed that it didn't match the image in my mind? I think it does help knowing that I created it from a newspaper, salvaged organza and some dodgy dyeing. Next step is to highlight elements with stitching. When It's complete I'll show you the result.