Wednesday, 15 October 2014

Knitting Stitch Show - Alexandra Palace

We went from this..... 


...to this and..... 
...and this....


...and this.

I was keen to gain experience by being part of the hanging team and it was interesting to get a glimpse behind the scenes of a major show... I'm so pleased that I did it.

But it wasn't all work and stewarding, I also had chance to look round the galleries and the stalls. These days the latest gizmos and books don't have the appeal that they once did and now if I have a supply of white fabric, dyes and some threads then I'm happy. (So what am I doing with all the other things I have? Mmm....)  

But I did spend some money...I really liked the different expressions Gina created on these faces and I couldn't resist the grumpy looking one, 2nd from the left. The expression on the face reminds me of someone I know....someone I'm very fond of as it happens. 


At one time, it seemed there weren't many galleries that you could take photographs in but fortunately that seems to have changed recently and here are a few of the photographs I took. 

i loved this piece by Cindy Kearney, which was exhibited in the zero 3 gallery.


This beautifully delicate bowl was made by Gladys Paulus.


This dog by Nicky Barfoot certainly had attitude!

In the past I have tried doing needle lace and as a result I have a much admiration for Robina Melville who created this needle lace cat mask.


I found the work by Jo Beattie very inspiring, how nice it would be if these were based on photographs of your loved ones? I don't think I was alone either, I over heard a number of people talking to Jo about commissions.


So all after all that preparation and build up, it's all over....until Harrogate that is. See you there?


Sunday, 5 October 2014

Hue at the Knitting & Stitch Show

My work has been delivered. What a relief! There's nothing else I can do now. The plan is that my three pieces will all hang together on the same wall and so I wanted them to be presented in a similar way and with two of them having 3D elements on the front they needed to be supported. I've had all three pieces stretched by Val of Kendals framing and I'm very pleased with the result. Val comes to Art Van Go every Saturday, which is handy for me as I live nearby. Val has given very useful advice and has been very patient with me as I have explored different options and made some changes.

This is 'Geo Landscape II'. Each of the blocks is based on the shapes in the landscape and the background cloth has been printed using some of the shapes. The colour gets lighter as it moves up the piece and the shapes have been outlined with hand stitching.

70 X 60cm
Believe it or not this is a picture of the same piece! I think the real colour is somewhere in between the two photographs and I've had the image below printed onto some postcards, which I will have for sale during the exhibition.


This is Geo landscape III. In a similar manner to the Geo Landscape II, I created a strip of fabric, using shapes from the landscape as my source but this time I pleated the strip. The background fabric was printed with triangles, to echo the more angular forms in the pleating. Again, I outlined the shapes with hand stitching and the depth of the colour fades as it goes up the piece.

90 X 58 cm
I have also had postcards printed with this detail from the piece and I was really pleased to see the stitching visible on the postcard. All the faffing composing and playing with the light reflector paid off.


Initially I wasn't sure whether to use an image of the whole piece or just a detail on the postcards but I've almost got the best of both worlds by including all 3 finished pieces on the back of the card and the detail on the front. It took some work in Photoshop to get what I wanted but I think it was worth it.


And last but not least, Geo Landscape I...the piece it all started with. I have posted images of this before but this is the first time I have shown it stretched....and anyway you would want to see the set wouldn't you?


The packaging of the 3D pieces has been a concern for me but after much thought I hatched a plan for using cardboard boxes and polystyrene. However, hubby thought they needed something better and stronger and he has made me wooden boxes for the 3D pieces. How lucky am I? They will be secure and I'll certainly have less cause for concern about them being transported in a crate to Harrogate now.

So here's one of the boxes with space for the 3D bits to fit into the gap.


And here's the piece in the box...it's a good fit isn't it?


and here's the three of them ready to get transported....


There's more to this exhibiting that meets the eye, isn't there? I wonder how much time I have spent on these pieces, the packaging, the photography etc. Lots! I'm sure it's all going to be worth it though. Perhaps I'll have the discipline to keep a tally for my next piece?

I'll be stewarding on the stand on Saturday, so if you're visiting then come and say hello. I'll be visiting with my Mum and friends on Sunday, I get the feeling that there won't be much time to see anything on Saturday!

Tuesday, 23 September 2014

Printing Christmas Trees

The Hue group are exhibiting at the Knitting and Stitch Show this year and I have been working on three pieces for the exhibition. Finally, finally, I have finished all the stitching! One piece has been stretched and I hope to collect the other two pieces after stretching this week. 

So having finished the stitching, it was nice to have a relaxing day block printing with Jamie Maldon from Coloricious at the local branch of the Embroiderers' Guild. I have done a fair bit of printing but I haven't really used block printing in my work and to be honest, I haven't had much success when I have tried it previously.

Jamie's Christmas blocks had just arrived and so we learnt the printing techniques by printing on an apron. I look quite proud of mine don't I? Jamie's simple instructions and tips were very useful and I'm definitely more likely to include block printing in my work now. 

I'm rather fond of Christmas Trees but as there were so many blocks to choose from and as I'm a little indecisive, I printed a number of them side by side to make choosing easier.


Printing Christmas trees on fabric gives lots of opportunities to embellish with stitching and beading (think tinsel and baubles) and I took a shine to this tree - lots of room for things to dangle from these branches. This one was printed on upholstery fabric but I should have used more ink.


This one was printed on some green fabric and looks a little...well green...but I think that the addition of beading could bring it to life.


But this was my favourite one and most closely resembles my usual work. I used the tree block to print a background pattern in light blue and silver paint and then overprinted the tree. This was the block I wanted to come home with.


But whilst I was waiting to pay, I noticed another tree block that I had completely missed and I couldn't resist this one either.


So now I'm the proud owner of two Christmas Tree blocks but I haven't used the block on the right yet and I am looking forward to printing with it. Before I do use it though, I need to work out how I'm going to package my work for the Knitting and Stitch show. When I decided to include 3D elements on my work, I didn't think about how difficult it would be to ensure that it travelled between venues unscathed. I'll think about it next time!

Sunday, 7 September 2014

Denise Lach - Designing with Letters - Part 2

I'm just back from a lovely week spent in the south of France and I had every intention of post the 2nd set of pictures from Denise's course before I set off but by the time I had got one piece finished and ready for the framer and another ready for stitching on holiday, I just didn't have the time. 

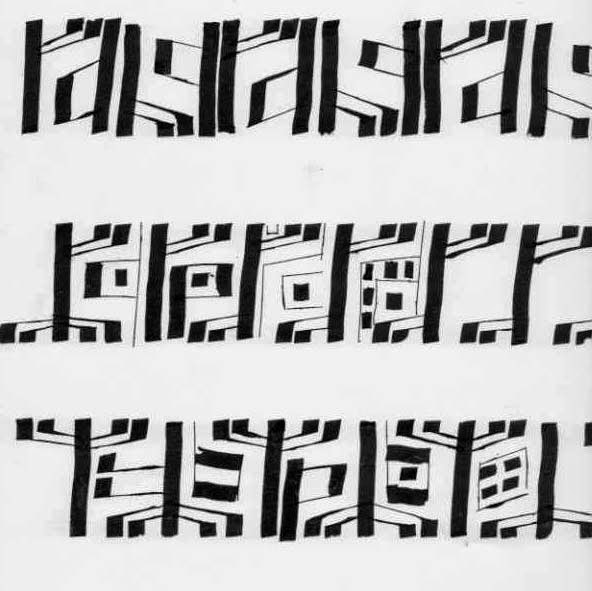
So here they is some of the work from the 2nd half of the Denise's course and you will see that I started to work in a less controlled way.

This basic design was built up using a few selected words, with the letters elongated and stretched to make a pattern. I then took photocopies of the design and started to work into and over it by blocking areas out using pens and using ink and tools that were less controllable and dripped ink down the page. 


When I was on holiday these buildings reminded me of these designs, minus the dribbles, obviously. This idea/link might be something worth following up when time permits.  


So going back to the course... I also started exploring how I could use lettering to represent a landscape and started by creating tree trunks and under growth with letters.


I then tried using some coloured ink and a slightly different approach to creating the landscape but still using letters..


...and then a slightly looser style...


You can see from my design board below, that the work I was producing in the 2nd half of the course was much looser and that I have only shown you a fraction of it. My aim was to explore as many ideas and avenues and possible, rather than creating a finished piece of work and I think I did that, I came away with lots of ideas to develop. 


You may know that last year's holiday inspired my Barge in the Mist piece piece and so I was hoping that I would come back with inspiration for my next 'must-make' piece but unfortunately I didn't. I saw some lovely landscapes, architecture and wildlife but when I look back at my photos, it's this one that's giving me food for thought:


This was taken from the train in France and I wanted to see how much blurring I would get when I took the photo from a moving train and whether it would create any interesting images. I didn't get any blurring at all and I guess that's down to the wonders of technology but I did like the way my red top and yellow fabric reflected in the window and created a colourful and interesting landscape.  Something else to think about because a lot of landscapes can be very green, certainly in this country and this could be one way adding some additional colour interest.

And when I returned home this is what I found on my doorstep....


...what a lovely surprise! I had won Gina's giveaway and as ever, Gina had presented the buttons beautifully. I'm not sure how I'm going to use them yet but in the meantime, I'll just enjoy looking at them as they are.


Tuesday, 26 August 2014

Denise Lach - Designing with Letters - part 1

I recently spent a very enjoyable and inspiring 4 days on a Denise Lach course. Not a calligraphy course but more a course learning about designing with letters. I bought this book about three years ago and I have been hoping to go on one of Denise's courses ever since. I can thoroughly recommend the book. 


The course was based on 'foreign' scripts and as the idea was to use the letter shapes to design, it didn't matter at all that you couldn't read it or understand what you had written. I chose Runes as my script and this was one of my first attempts at using it. 


I also wrote the script a lot smaller and I preferred this....


....and then I mixed the two sizes...well I did enough to get the idea of what it would look like and I liked the variation this provided.


Then I took just one of the letters and the added a little variation to it.


....and then used it to create a border pattern.

But border patterns are not really my thing and as I was thinking about my preferences, I realised that I would prefer to work with some more familiar letters and words. So I started to use words that had some meaning to me even if the were illegible to everyone else. Not that this was particularly illegible, I'm sure that the eagle eyed amongst you can read some of the words below.


Then I varied the shape of the size of the individual letters and this made it more interesting.
So lots of paper filled and the design board in this picture pretty much summarises of the first half of my course.


But in the second part of the course I got freer and started linking the designs to landscapes and I'll show some of these in my next post.


Saturday, 9 August 2014

Festival of Quilts 2014

On Thursday I spent a nice day with family and friends at the Festival of Quilts.  It was first time that I have been to the first day of the show and I was amazed at the length of the queue to get in. The queue was so long that we had coffee until it had died down. Is the first day always like that?

As usual there were some amazing and inspiring quilts. How do the judges pick the winners? It must be very difficult.  Here is small selection of the photographs that I took....

I wasn't familiar with the work of Ann Johnston but really enjoyed seeing her gallery.


I was particularly impressed with this piece of fabric which was painted to resemble wood, unfortunately my photograph doesn't do it justice.


I recently joined this the Contemporary Quilt Group so I was particularly interested to see their exhibition. This piece was made by Judy Fairless and I love the colours in this one.


This piece was by Liz Smithbone, I really like the design of this piece and the limited colour palette.

This colourful quilt, in the Traditional Quilt category, caught my eye and was made by Tracy Aplin. I liked the design and of course cotton reels are close to my heart. Wouldn't it look great on the wall of a sewing room?


Gillian Theokritoff's 'David' was made up of lots of individual squares of fabric and was amazing. I can't imagine being able to design a piece like this.


This is a detail from a piece by Mags Ramsay and I particularly like how the hand stitching links the piece vertical elements of the piece together.


Dyeing and printing fabric is the foundation of my work but do I love work which is made of a single colour or has minimal changes of colour. This piece was made by Alicia Merrett


This year, as last year. I was very impressed with the miniature quilt section. How do they work so small? This exquisite piece was made by Andrea Stracke.


There was lots of young talent on show too and I loved this piece by Millie Ayers and I could relate to the title of the piece 'An unwelcome guest'. Cute though they are.


I've got loads more photographs of lovely quilts but by now you've probably seen enough and I'm running out of steam, so I'll end with a picture of me next to my quilt at the exhibition....


...and a picture of some of the fabric I bought. Spot a theme? I fancied making a simple top in some novelty fabric but it looks like I'll be making three!


So whilst I'm still feeling fresh and motivated by this year's show, I'd better start thinking about what I can do for 2015! Any ideas?

Sunday, 3 August 2014

New Talent

I love this doll! Especially her eyes. This doll was made by Ella Oliver, aged 11. How talented is she? I have never met Ella but I work with her Mum and I enjoy hearing about Ella's enthusiasm for textile art. I hear Ella's thinking of starting her own textile blog - I look forward to reading that. I have shown this picture to lots of my textile friends and everyone has loved it, keep it up Ella.


To mark the National Day of Stitch and to try to attract new talent to our branch of the Embroiderers Guild, Anne, GinaGill and I sat and stitched in David's book shop, Letchworth and very enjoyable it was too. We laughed, we enjoyed lovely cake from the cafe, bought books from the shop and met some very nice people. We had much more interest than we dared hope and our thanks go The Comet  for featuring us in the paper. So many people came in saying they had seen us in the paper. Thanks too the staff at David's bookshop for allowing us to use their venue and making us feel  so welcome. 
Us just settling in at David's book shop - minus Gina who took the photograph.
We gave out free broach kits to all interested stitchers, the only catch was that there were no instructions in the kits! We will be showing how to make the broaches at our next meeting on 6th September and hope that many new people will come to our meeting and see what a friendly group we are. You can see that we are each wearing one of the broaches we have made. It would have been nice show some photographs with our visitors but of course when we enjoying chatting to visitors about stitching, taking photographs was not on our mind.

This may seem like a simple idea but it took a lot of organisation and took a lot of time to make up the kits and I did none of it. All I had to do was turn up, stitch, chat and talk enthusiastically about our group which was easy to do. Thanks Gina, Anne and Gill for all your work.

I'm sure Ella will soon be inspiring others to pick up a needle and thread too.